Minecraft is a game with creativity and engineering in its every step. One of the most fun things you can build in this game is a flying machine. Flying machines in Minecraft can transport you across long distances or help you reach new heights.
Using your very own flying machine, you can fly across the sky of Minecraft. This guide will be useful to all players, regardless of experience level. Let’s discuss how to quickly build your own flying machine in Minecraft.
Step-by-Step on How to Build a Flying Machine in Minecraft
Building a flying machine in Minecraft is somewhat challenging without help. But if you follow these simple step-by-step instructions, before you know it, you will be airborne.
Check Also: How to Make a Fence in Minecraft
Step 1: Get off the ground
First off, you should start building from above the ground. For example, you can build blocks to make a tower (commonly known as a “nerdpole”), climb a tall tree, or ascend a mountain. Stack a few blocks until you have enough height to build your machine comfortably.
Step 2: Place the First Piston
At the top of your highest block, place a piston. Whichever direction the head of a piston is, that is the direction your flying machine will travel. Ensure that it is facing the direction in which you are going.
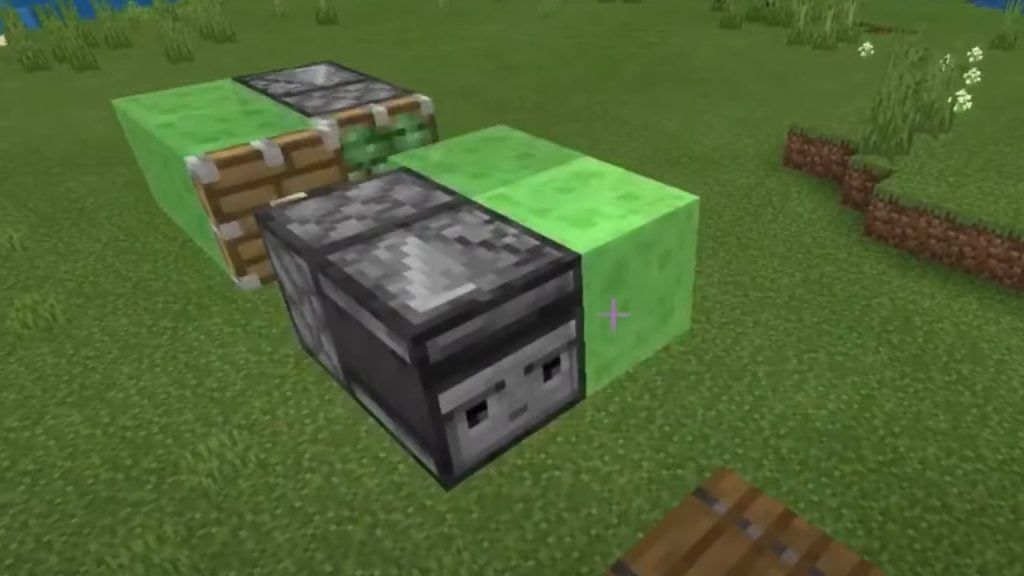
Step 3: Add a Slime Block
Now, attach a slime block right in front of the piston. The slime block should be right next to the piston’s head. This block will help connect parts of your machine and move them together.
Step 4: Two Blocks Placed
In front of the slime block, make sure to put two blocks on the same line. In this position, you can use any type of block in case you want to expand the base of your flying machine.
Step 5: Add a Sticky Piston
Remove the first of these two blocks you just placed, leaving a hole. Place a sticky piston facing the other way from the first piston you have placed. Attach the sticky piston at the last block.
Step 6: Replace the Second Block
Replace the block in contact with the sticky piston with another piston. This piston is supposed to face the same direction as the first one you placed. It acts to push your machine forward.
Step 7: Place Another Slime Block
Place another slime block in front of this new piston. This will move your machine as one unit.
Step 8: Place the Redstone Blocks
Resting on top of the two slime blocks, place Redstone blocks. These will power the pistons when the machine will get into motion.
Step 9: Clean the Base
Now, you have to get back to the ground and take off all the blocks with which you placed your flying machine high. Your machine is supposed to be hanging in the air, showing its ability to fly.
Step 10: Start the Machine
Place a redstone block on the sticky piston. This will extend the piston and thus set your flying machine going.
Step 11: Keep It Moving
To keep the machine moving, one has to remove the Redstone block from the sticky piston that has just been placed on it. The machine will keep on moving in the air in a loop.
Step 12: Stopping the Machine
Stopping your flying machine is as simple as removing one of the Redstone blocks from the blocks. This will cut power to the pistons and thus stop your machine.
Conclusion
Building a flying machine in Minecraft is a really fun and rewarding project. It will enable you to explore the game world from the skies. You can use the following simple steps to guide yourself in developing a primary flying machine. However, it is important to note that this is a kind of disposable design.
You might have to rebuild the machine when it arrives at its final destination, just in case you want to travel again. Only the Java Edition and the Playstation 4 Edition of Minecraft are compatible with this design. Windows 10 Edition, mobile Minecraft, Xbox One, or Nintendo Switch, aren’t compatible. You can work and tweak other designs to create more exciting flying moments!